Documentation on how to use the software
Making and Editing Appointments
Admin Functionality
Viewing and Printing
Advanced Issues
Technical
How to make appointments?
To make an appointment you just need to click on any "click here" link on the
schedule. The software automatically scans the day for all open slots and turns them into
clickable links. This will then take you to a new page where you will enter information about
the reservation and select the duration (if applicable). Then click the update button and you will then see
your reservation appear in the schedule along with a message saying "Successfully Reserved".
How to cancel appointment?
The scheduling software can be set up with several different configurations. Depending
on your configuration cancelling can be as easy as just clicking a button. For others you
will need to do the following steps if you do not have the button cancelling option turned
on:
- Step 1: First click the 'Admin' button at the bottom of
the scheduling page
- Step 2: Retype just the name or first input field ( usually name
)
- Step 3: Select the time (e.g. 9:00AM)
- Step 4: Select which appointment (e.g. Doctor 1)
- if applicable Select an end date (if spanning more than 1 day)
- Step 5: Select "Cancel Appointment" from the radio button choices
-
Step 6: Click the update button
How to reschedule appointments?
To reschedule, you have to first be in the Control Panel. Then select the time from
the drop-down and which appointment (i.e Staff 1, Staff 2 or Staff 3 etc). Last select
"Reschedule" from the optional menu and click the "Update" button. This will then cancel the
appointment and copy it to the clipboard.
You can then go to a new day,
select a new time and appointment (i.e service van 1 or 2), and select "reschedule" again.
Click the Update button. This will paste the old appointment from the clipboard
into the newly selected day/time.
How to edit appointments?
You can also edit an appointment if you just want to change certain
information. For example suppose your appointment has a name, phone and
comments field. You can change the phone number without cancelling and
re-making the whole appointment.
After loging in as admin, click on the appointment. This will take
you to a new page which should have a button called, 'Edit Reservation'.
Click that and follow the self-explanatory instructions.
How to block days of the week or time slots so that no one can
schedule appointments?
If certain times on certain days are unavailable then you can use
any of the following methods. Please read them carefully as each method
accomplishes a slightly different task.
- The Availability module( under Advanced Modules ) to block off times
for individual staff/resource schedules that are
always unavailable. This will block off the time every single week.
Use this
module when you want the blocked time to repeat every week forever, with
no start or ending date.
- The Set Hours of operation module
also within the Availability module to block
all schedules off for the same times every day.
- You can also use the Block day module to completely
block out a range of dates for each or all staff , e.g. May 10 to July 20 .
- Last, you can book times as 'unavailable' by making a repeating appointment
for times they are unavailable. This option should be used when you
are trying to block off times for only certain date ranges and for certain
time ranges e.g. Joe is
unavailable from 7-10 AM from March 1 to March 21.
How to completely block out a single or range of days?
You can use the Block day module to completely
block out a range of dates for each or all staff , e.g. May 10 to July 20 . The module is
located inside the 'Availability and Hours of Operation' module under the 'Advanced Modules' button
How to add an appointment on top of a recurring blocked off time?
First click the 'Admin' button at the bottom of the schedule. This will bring up
the control panel on the right-side of the schedule. Make your appointment using the control panel,
by entering the details, selecting the time and length and clicking the submit button. This will overwrite
a recurring blocked off time with your newly made appointment.
How to make a repeating reservation?
First you need to be logged in as administrator using the admin password. Then you will
need to select the Repeating (Optional) drop down menu. Set it to Every Week
if you wanted it to repeat once per week. The default is to repeat every day which may
not be what you desire, so be sure and select every week if you want that.
Make sure and give the repeating appointment a meaningful name like 'Unavailable Tuesday afternoon'
. This way when you delete it you will be able to delete all such appointments with one mouse click. If you give it a generic name of 'Unavailable'
and try to delete all 'Unavailable' appointments, the software will delete every one called
'Unavailable' which may end up deleting other times you blocked off using 'Unavailable'.
Last, select the duration or ending date of this repeating reservation. Use the drop
down menu to select the last day you want this reservation to go until. Then click the
submit button and it will create the reservation .
The software will issue a warning for each
conflict it finds in the future and will not overwrite them. If you would like to first
check the reservation can be made with no conflicts then you will need to use our
Repeating module which lets you first check for no conflicts before making the
appointment. This module is under development and is available in the Advanced Module
page.
How to delete a repeating reservation?
The software does not remember which events are repeating. The repeating
feature is just there to save time entering in many reservation at once.
You can delete any of them like an ordinary reservation. If you wanted to delete
all the repeating events you would have to follow the exact same steps you did to create the
reservation, except select "Cancel Reservation" from the drop down menu before hitting
the "Update" button. This is all done in the control panel in the
rightmost part of the page after you click the 'Admin' button.
Alternately you can use the Find-Delete module available after you log on as
admin and click the Advanced Module button. This module lets you delete all
appointments over a specified range of days that
match your search criteria. For example you can delete all appointments that match 'Patient
treatment' from September 1 to September 15. The module will display a list of matching
reservations and ask you to confirm before deleting.
How to search all appointments made?
There are two ways to search for appointments. The first way is to
search the log file which records all appointments ever made upto 6-12 months in the past. For appointments older than this, please
consult here. You can
search both in the past and future. The second way is to use the
Find-Delete module which is available after you click the advanced
module button.
The log file can be searched by several fields. First log on as
administrator using your admin password and click the 'Update' button.
Next when the admin buttons show up, click the one at the bottom called
'Search Log'. This will take you to
a new page that lets you search by several criteria. To find all
appointments for a certain month just type in the month name in the
date field and leave the rest blank.
You can also
search multiple criteria, i.e. find all appointments by a certain person
in a certain month with a certain resource.
How to download the log file?
First log on as admin then click the 'Search Log' button at the bottom
of the page. Next if
you click the Save Log File to Excel button you will be able
to save
the entire log file locally in Excel. You can also save it locally
as a CSV and import that into an Excel or Access database.
We recommend deleting the log file after doing this as it can take up quite a bit of
space as it grows with time. Basically just check the checkbox for 'reset
log file' if you want to delete it after downloading.
How to export reservations to Microsoft Outlook?
Click the 'Backup' button at the bottom after you log on as admin. Then
follow the instructions on that page.
How to import reservations into Microsoft Outlook?
One option is for us to turn the feature on that emails each appointment
to you as an outlook calendar notice. You simply have to accept the notice
and Outlook should add it to your calendar.
The other way is to export a csv file to import manually.
You will need to click the 'Backup' button at the bottom of the page
after you log on as admin. This will let you export reservations for each
selected staff as a csv file that can be imported into most calendaring
softwares such as Microsoft Outlook.
How to book multiple schedules at once?
Often you may need to book several people at once, like Installer 1
through 5 at noon for lunch. This can be done in one step . First log on
as administrator. Then in the control panel on the right, enter the
information for the appointment. After selecting the time and length of
the appointment, select 'Installer 1' for the 'Select staff to book'. Next
select 'Installer 5' for the 'Select staff to book upto (Optional)'
drop-down. Last click the update button. This will effectively book the
same appointment for Installer 1 through Installer 5.
How to upload documents i.e pdf, doc, excel etc. with each
appointment?
First you need to check with PeoriaDesignWeb.com if this feature is turned on. There is
an extra monthly cost associated with this feature due to the storage space of the files.
While in the appointment scheduler, click the upload button. This will open
the document repository in a new window. In the document repository you can manage your
files and upload new one. Click the Browse button to select a new file to
upload. After you select the file,
you need to click the 'upload document' from the dcr window. This will then upload it and
automatically fill the name into the appointment. Then simply return to the appointment
scheduler and submit the form to process the appointments. Now when you click on the
appointment you will be able to view/download your uploaded document.
How to view months ahead to reschedule an appointment?
The show next/previous month buttons are available when log in as admin and
appear at the top of the page.
If your concern is toggling back and forth while rescheduling you can also have two
browser windows open.
Since this is web-based software you can have as many browsers open.
How to print the schedule?
You will need to click the 'Print' button on the scheduler,
not the print button on your browser. First click the 'Admin' button at the bottom
of the page. Then at the right towards the bottom, under the
Admin Login box should be the 'Print' button.
To print the cell borders you have to go to Tools -> Internet
Options -> Printing and turn on printing of images in your browser.
How to view/print just one day's schedule?
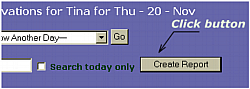
If you are logged in as admin, then at the top check the checkbox called
Search today only and click the Create Report button.
Alternately, if you select just one person's schedule then there is a 'Print
Today' button that comes up underneath the 'Admin login' box. You will
need to click the 'Admin' button first.
To select just one person's schedule, first login as admin.
At the
bottom left you can select just one person to display. Then a 'Print
Today' button will come up at the bottom right of the screen
How to view the schedule for just ONE resource?
If you click just the resource name in
the side by side view it will default to the weekly view which lets you
see open times.
Another way is to log on as admin. Next in the
'Optional filter' box at the top, enter the name of the resource you want
to view. Then click the 'Create Report' button. The program will search
the schedule and only report results that match the search criteria you
specified.
The last way is after you log on as admin you can also display single
schedule views from the button/list at
the bottom leftmost of the page. You can select a schedule, and hit the
'display button'. This
will
liing up the individual view for that schedule and you can increase the days shown by
changing the 'Show expanded view' menu.
How to log on as admin?
First click the 'Admin' button at the bottom of the page.
Next you will need to enter your admin password in the password or admin
log-in box. The admin log-in box is located at the rightmost part of the
screen. You may need to scroll right and down towards the bottom of the
page to find it.
How to edit the list of users?
When logged on
as admin you will see many new drop down menus and buttons. Click the
button called 'Edit Members' at the bottommost left of the page. You will then see the list of players to
edit. You can just directly edit/delete members in any order. the backtick
` is used to separate fields, so make sure to not delete that. The format is
typically:
username`passcode`name`
When you are done you can check the checkbox next to the 'Save Changes'
and hit the update button. The username can also be an email address, in
which case the program will send a confirmation email of the appointment
to that address.
If your system is set to limit reservations a user can make, then you
may see a number like 3023-2 after the name. Just ignore it. If you delete it,
the reservations for the user will reset to zero.
The tab character
can also be used to seperate the fields.
So you could just copy/paste data from Excel as long as you have three columns
of data in the username, passcode, name order.
If you put a ** in the name, then anything you type after that will
not show up to the user. This could be useful if you want to store information
about the user which you do not want other users to see. For example,
you could have the following name:
Test User ** Phone: 309-241-2941 , Email: test@test.com
How to add a special message of the day?
When you log on as admin you can add a special message for the day. To do this you have to make an appointment
for the the last time of the day. Whatever you type
will appear beneath where it says "Reservation
for Mon - 1- Jan" at the top of the page.
How to change the text on the scheduler?
Under 'Advanced Modules' click on the 'Messages' button. The header
message appears on the top of the scheduler and the special message
appears on the page where they enter their booking details.
How to control the printing?
This is really controlled on your end
through the browser and printer page-setup. You may need to change to
landscape, shrink page, decrease font etc to get things lined up
the way you want.
You can shrink the text size down before printing. In your browser
go to 'View' -> 'Text Size' -> 'Smallest' from the drop-down menus.
Alternately you can press the 'Ctrl' key and use the scroll wheel on your mouse
to try shrinking the font size down. Unfortunately Internet Explorer has a limit
to how small you can shrink the page. But Mozilla Firefox has no such limit,
so you can try installing that browser.
To print the cell borders you have to go to Tools -> Internet
Options -> Printing and turn on printing of images in your browser.
If you are using Mozilla Firefox, Try File -> Page Setup and check the
option for printing of background
How to view the entire week and month of appointments?
To view the entire week, you will need to click the 'Show week' button.
In the weekly reporting view you can click on the dates to go directly to
that date.
To view an entire month you need to just have one resource selected. To do
that you need to first log on as admin. Then click the resource name you want to view as shown below:
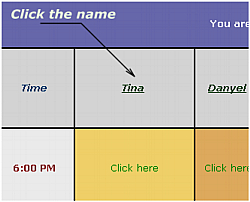
Now you can click the 'Create Report' at the top to display the
entire month for that one resource.
Again you can click the dates in the
monthly view to go directly to the appointments for that particular day.
How to see the past days appointments?
If you select the 'Show Another Day' drop-down and scroll down
way to the bottom you will see the old days to select. Typically the program
archives upto 60 days of old appointments. You may need to log on as Admin to
see the entire list of days in the 'Show Another Day' drop-down.
Another way to find old appointments is explained in
this part of the documentation.
How to make a multi-day appointment?
To make an appointment for several days, specify the 'Repeating until
date' in
admin mode. The 'Repeating until date' is a drop down that only comes up
after
you log on as admin.
How to color code an appointment?
You can do it when you log on as admin and make the appointment using
the control panel that appears on the right of the schedule. There
should be a drop down for select color. I do not recommend colorizing
appointments since it can be buggy, particularly when you have to edit
the appointment. If you are just colorizing a one-time appointment, it should
be fine.
You can also colorize an existing appointment by using the same control panel
on the right of the schedule . Fill all the drop downs except for the actual name,
give it a color, and click the Submit button.
How to just change the length of an appointment?
When you go the reschedule page, check the box called 'Just change length of this
appointment?' . Leave the date, time and person unselected. Just select a new length and
click the reschedule button.
How to restore a backup when the server is down?
Note: This feature is only available to clients on the Gold support plan
Only attempt to use this feature if the main scheduling server
is completely down. Do not run this feature from the main server. Only
run it from the backup server link that should have been sent to you before.
Log in as admin, and under 'Advanced Modules' you will see
a new button to 'restore a 1-day old backup'. Click that and follow
the simple instructions to restore your backup. It can only be used
for viewing purposes, since changes made to the backup system will
not transfer to the main system.
The backup system is on another server so
anything you do there will have no effect of your main system.
You can try running the backup anytime to make sure it is working correctly.
When you press the 'Backup' button it will just put all the data from
your main server into the backup server. So you can use the backup
system to view all your appointments.
How to insert appointment details from a
prior appointment?
It is possible to automatically insert details from a prior appointment.
After you log on as
admin, click any of the "Click here's" . On the next page there will be
a Find Customer button on the top and right of the page. Type the first
name of the person and click that button. If that name is in the log
file, it will insert the remaining details for that person.
Keep in mind the log file
only stores appointments for 6 months to a year. So if a
repeat customer has not come in the last several months, there is a good
chance the program will not find them .
How to change the timezone of the scheduler?
You can select the timezone in the 'Advanced Modules' button. For
example, if you want the
scheduler to start a new day at 8AM, then pick a
timezone where 8AM your time
corresponds to midnight somewhere else. But this may cause problems when you have daylight
savings time. If the timezone you pick does not observe the same daylight savings time as you
then your scheduler will be off by an hour. When this happens you will have to pick
another timezone +/- an hour from the current one picked.
How to enable Javascript?
First make sure javascript is enabled on your browser.
You'll find the setting under Tools->Internet Options->Security Tab
bar->Custom Level->Enable Active scripting (at the end of the list).
If it is already enabled then we recommend downloading Firefox . There are many small issues
with older versions of Internet Explorer. Rather than spend a lot of time
trying to pinpoint these unique problems it is simpler to just get the
latest Firefox browser. It will not take more than a few minutes to
download and install.
How to fix the column width?
The column widths are automatically sized depending on what is inside
them. One solution is to put a form in your login page that lets you
select which schedules to see. That should keep the page width down.
Another reason for the extra width is you have some long words
in your entries e.g:
house__D11__1625__receiver800-122-6409
The program replaces some unusual characters with underscores. If you
can remove those underscores and not use the special characters, it
should shrink things down a bit.
How to use the database module?
If your system has been set up with a database then you just need to enter a record
number and the appointment will automatically fill all the information for that record from
the database.
You can get to the database module from two ways. If your site has a general login page,
then after loging in you will see a button for 'Your customer database' underneath the
scheduling buttons. Otherwise you can access the database module after loging in as admin in
the scheduling system. At the bottom of the page will be a button called 'Edit Database'.
After clicking the button you will be auto-logged into the database module.
Click
here for details on using the database module.
How to fix 'Sessions Expired' messages?
The most common cause is if Internet Expolorer is set to
'block all cookies'. In your web browser go to:
Tools -> Internet Options -> Privacy
Set the slider down to Medium
Another cause is if the date/time on the computer is set incorrectly.
Please make
sure
that the computer system date/time is correctly set to the time zone
that
you are in.
If you are still having problems, try going to:
Tools -> Internet Options -> General -> 'Delete Cookies' button
Then go to:
Tools -> Internet Options -> Content -> 'Clear SSL State' button
Then restart the computer and see if things work.
I also recommend installing
Mozilla Firefox
as it is generally more robust
than Internet Explorer.
Last, if the computer is behind a firewall(like Norton Internet
Security
or
Zone Alarm, etc) or a proxy server then this may also be preventing
the
cookie to be set on the computer. You would either have to disable the
firewall or (in the firewall program) specifically allow the website to
set
cookies. Then restart the web browser. In the case of a proxy servers,
you
would have to configure the proxy program to not filter the website.
How does the system send emails?
The system can be setup to send a confirmation email to the user
each time they make an appointment. By default, the admin will also
get an email with the subject 'Schedule Update' each time the user makes
a booking. However, it is possible to turn the feature off for the admin
to get cc'ed on each email.
Neither the user nor the admin will get an email if the appointment is made during
the administrator mode. So if the admin is logged in, any appointments they make will
not generate
any emails. This is to prevent email clutter when the admin is making
many bookings.
The system will also send a new confirmation email if an appointment
is edited with a new email address. However, this only works if the
editing is done in the user mode. If done in the admin mode, no emails
will be sent.
The program can also send one email reminder x days before the appointment. The number x
can be whatever you choose, but it is hardcoded into your configuration file. Keep in mind
the system sends the reminders when someone accesses the system x days before the appointment.
So if nobody has used your system for more than one day, then it will not send reminders for the
day it was not accessed. This should not be a problem as long as someone is using your system
at least once a day.
Why are users not receiving email confirmations?
If users are not receiving emails, the most likely reasons are:
- They did not enter an email when making the booking
- The email confirmations are going
to their spam/bulk folders
- In rare cases, their internet email program
could be blacklisting my domain.
If this is the case
I can move your account to another server, but you will need to update
all your links to it.
Why is the 'Search Log' no longer finding any appointments?
The log has a limit on how many appointments it can store. Once that limit is reached it automatically
archives and clears itself out. You can then download the archive in the same
'Search Log Module', by clicking on the button to 'Download old log file to excel'. After downloading
the old log file you can use Microsoft Excel to open and search it.
Keep in mind you can still search for existing appointments using the 'Find-Delete' module available
under advanced modules.
The reason this happens is the program can not keep storing appointments endlessly. This makes the log file too large and can cause
performance issues with the scheduler. Also it is a good practice to not store so much personal information online. For this reason
you should download the archive and store that locally on your own computer.
To prevent this problem you have to monitor how large the log file is
getting. This is specified on the same "Search log" page. It tells you
how full it is. When it gets full, you need to trim it down by clicking the
button for "delete old appointments from log" .
What is the difference between the log file and
the scheduler?
The log file records everything, i.e appointments and cancellations.
So if you were to use the program for several years, the log file would
store all several years of data. This is why it automatically has to
clear itself of old appointments to prevent from getting too large.
The scheduler only
holds appointments for two months in the past and one year in the
future.
For a small charge, I can go in and erase all appointment older than a certain date
from your log file to bring its size down.
How does the weekly appointment email work?
The program sends an email of your weekly appointments twice a week.
It sends one email on Monday and one on Thursday. Clients on the Bronze
support plan are required to have this as it is their only backup in
case the server is down. If you do not wish to receive these emails,
then contact me asking it to be turned off in your system.
For
clients using the secure version of our system, all appointment details
will be replaced with a generic 'Booked'.
The main server is down, when will it be back up?
Whenever the server is down use your backup system for viewing purposes.
Theoretically, if you make an appointment on the backup it will synchronize with the main
scheduler when it comes back up. However, this is a complicated process known
to have issues. Therefore, the recommendation is to only use the backup system
for viewing purposes. If you do make appointments then check they synchronized properly.
I can not predict when the server will come back up, since it is beyond
my control. I do not run the server, I just rent space in it, like
renting a room in a skyscraper. Be assured the server admins are
aware of the issue and working on it. Downtime is inevitable with web based
software. For this reason I spent a lot of time making the backup system
work just like the main system.
Why do glitches occur?
All 100+ clients share the same main code, except each client has a
different configuration file. The configuration file turns certain
features on and off specific to what they need. The main code is around
15,000 lines long. As new features are coded in the main code, other
parts of the code can inadvertently break, thereby causing glitches.
Almost everyday I am
working on the main code to add in features, fix bugs, and simplify
complex features. So unexpected glitches can occur often, but typically
these glitches can be fixed relatively quickly as long as I am notified as soon as you experience them.