Documentation - How to use the database
After logging into the database module, the first
form you will see is called 'Enter information to search or insert'. You can use that to
insert new records or to search for records to edit. If you are inserting a new record, make
sure and
check the checkbox called Insert new record . If you do not check this box then the
database module will just search for records that match what you typed in. It then brings up
the matching records in a spreadsheet type of editing mode. You can type over any enter and
click the 'update database' button to update it.
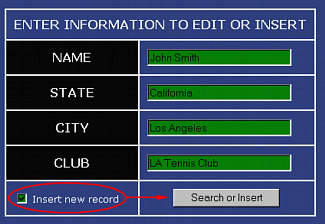
Example to insert a new record
To edit the records, you need to first search for it using the same form. Just type
in the first few letters of the fields you want to search by and click the 'Search or
Insert' button. Make sure not to check the 'Insert new record' checkbox! The picture below
explains this:
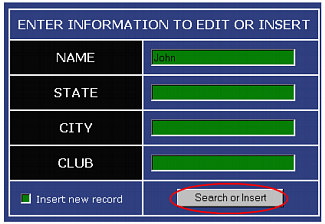
Example to search for all records for John
Next you will be taken to the editing part of the software. It basiaclly displays
all matching records into a spreadsheet like table that you can directly edit. Just click
the 'Update Database' button after you are done typing over the existing entries. You can
also check the 'Delete' checkbox in the last field if you want to delete that entire
record from the database.
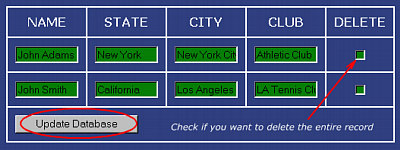
Example to update the matching records
Underneath the 'Search or Insert form' is a button called 'Search Database'. This just
lets you search for records and displays the records in a neatly formatted view. You can not
edit the matches, just view them. You can sort the fields by clicking the field heading.
Additionaly functionality is under development. If you want to change field names
click the button called 'Field Module'. You can rename fields, insert and delete fields.
To export/ import your click the 'Download BACKUP' button . This will save your database
to your local computer as a csv file. A csv file is a comma seperated
file that most spreadsheet and database programs write out. In Excel, just chose Save->as
and select 'csv' for the file type. Then you can select this csv file to upload and your
database will be overwritten with the new data.
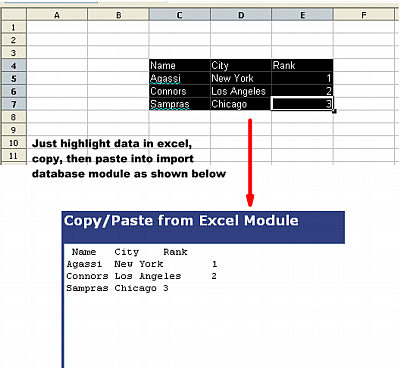
How to Import a small database from Excel
Click the 'Upload a new database' button then click the 'Upload a small database from Excel'
button on the following page . Data simply needs to be copy/pasted from Excel into the module. The data
must be very simple, i.e 2 dimensional with the first row being the field names. No merged cells
or formatting is recognized.
How to Export a csv file from MS Access
Just go to File->Export to save the table as a CSV file.
When you are exporting the file you will see a dialog that
looks like the standard "Save As" dialog. On the bottom of this
dialog there's a drop-down labeled "Files of Type". You have to change
this to "Text Files" (you'll notice CSV files listed amongst the text file
extensions).
How to Import the csv file as a table in MS Access
Open Microsoft Access and create a new database by clicking on the top-left 'New' icon
and selecting 'Blank database...', giving it a suitable name.
In the database window that appears click on the 'New Table' icon.
Select 'Import Table' and click 'OK'.
In the file browsing window that appears change the 'Files of type:' setting to 'Text Files'
and go to the location of the csv file.
Select the file and click 'Import'. The 'Import Text Wizard' will now appear.
The 'Import Text Wizard'
Make sure the 'Delimited' radio button is selected and click 'Next'.
As it is commas that separate the fields in a CSV file make sure the 'Comma' radio button is
selected.
Click on the 'First Row Contains Field Names' checkbox so that a tick appears inside it and
ensure the 'Text Qualifier:' field is set to double quotes ("). Click 'Next'.
You can store the data in an existing table, however, we want to create a new table so
ensure the store data 'In a New Table' radio button is selected.
You can go through each field choosing different options by scrolling horizontally and
clicking on the field name. For example, you can change the field name, specify the type of
data in that field or choose not to include that particular field.
Choose a primary key. If there is a field that for all submissions will be different in
every submission you can select 'Choose my own primary key' and select the field from the
drop down list. However, we want Access to add one for us; select 'Let Access add primary
key'. Access will put in an extra field which has a unique ID number for each row. Click
'Next'.
Type in the name for your table in the textbox labeled 'Import to Table:' and click
'Finish'.
A pop-up window will appear saying it has finished importing your csv file. Click 'OK'.
You will be taken back to the database window and your new table will be listed there.

|